Home » SIRTECH CLASSICS » Jagged Alliance: Unfinished Business » Maps, Mods and Editors » Tileset editing guidelines
| Tileset editing guidelines[message #269120]
|
Thu, 30 December 2010 03:53 
|
|
 Hawkeye Hawkeye |

 |
Messages:2416
Registered:October 2005
Location: Australia |
|
|
After spending a lot of time scouring the boards and attempting to get a better understanding of the tileset system I have put together some guidelines for those new to the system and included some step-by-step instructions.
I found it quite difficult to locate valid information easily, and I know others have often asked for advice in the past, but there is a lot of posts out there which in some part contributed to this document. The majority of these guidelines began from a translation of a German doc first posted by Guerillero on JA Basis, so thanks should go to him, as well as some clarification I personally received from the Scorpion.
For more experienced users and modders a lot you will undoubtedly know already, though feel free to add comments, corrections or suggestions but please keep it on topic. It is my intention to edit this as more concise or helpful information comes along, as well as include some screenshots for prosperity.
Hopefully this post can be a one-stop shop for those wanting to venture into the sometimes frustrating field of tilesets, and with a little more help than the often quoted 'suck it and see' approach. *sharp intake of breath* 'Let's begin...'
The tilesets are built up as follows. In the Tileset.slf there are 60 folders with the names 0 to 59. Each of these folders represents a tileset. In each of these folders there are different file types and on occasion a subfolder with the name 'T'. Tileset folders contain .sti, .jsd and on occasion .Jss files.
STI's - Contain the actual graphics of the objects. Some STI files have an S suffix which contain the shadow graphics of their corresponding object, however not all files include shadow graphics because they are not always necessary.
JSD's - Contain information on the structure of the object itself, including armour values, hit points and density they also have parameters to indicate if the object is destructible, openable, transparent among other things. The second main function of the JSD is to outline it's composition in game, like a collision box consisting of little cubes, this defines how well a Merc is covered by the object and how a Merc's line of sight is affected by it. Like s.sti files they are not always present, because they are not always needed.
JSS's - It has been suspected by others that these files are probably supplements to the JSD but have yet to be confirmed. The current Mod's I have looked at do not contain any of these files, so I cannot clarify further.
Most folders contain a 'T' subfolder. These contain smaller versions of graphics in the parent folder. Again they usually consist of the object and their shadow. These smaller 'T' graphics are used for the medium map, where you get an overview of the sector and can position mercs when before a battle commences.
The 'big daddy' of information regarding which objects are contained or chosen in a Tileset is in the JA2SET.DAT which resides in the BINARYDATA folder. This file can be edited with JA2TSE program. JA2TSE contains a list of filenames used in every Tileset, and which STI's are used. Besides, every entry is broken up into categories, grouping by 'Tiles' used in game, such as Ground textures as one group, Roads as one group, Trees as one group, and so on. within these groups you will then find individual 'slots' containing the Sti graphics and their S_Sti shadow cousins. In total each tileset has a limit of 150 slots, but as with most modding these limitations are often broken or flexible. Below is a shot from the mod Vengeance and here you can see the 50 tilesets to the left (00-49) and then the contents of tileset 49 DEMOTILESET to the right, note the 150 slots of which the last ones starting from 048-150 are empty but more on this in a moment.
The game begins by using the first Tileset '00 GENERIC 1' as your main global tileset. All tilesets after 00 use this set as the main master tileset to build from. When other tilesets are used in a map, their values simply overwrite whatever was contained in the parent 00 GENERIC 1 tileset. Say for example you have a 'truck_sti' referenced in slot 104 of your 49th (DEMO) Tileset. This sti, in this case of some trucks will overwrite the drum_01.sti which the GENERIC Set has there.
In layman's terms, think of the tileset 00 GENERIC 01 as a fully stocked supermarket with all your most useful foodstuffs stacked on different shelves, in this case 150 shelves. While other tilesets are simply alternative/ additional replacement stock for those shelves, the original supermarket is still there, but some of the items available have changed on the shelves.
To recap, the 00 GENERIC Tileset is the most important and effectively most used tileset in the game, and should not be changed if you only want to carry out smaller, local changes. Tileset 00 'Generic' is the main 'backbone' from which all sets originate from in game, and if any changes are made to it, those changes are likely affect all the other tilesets in game.
Step by step instructions
Important: I'd strongly suggest making a back up of your original files before making any changes. Just in case!
Preparations:
- Provide or locate the folder JA2\DATA\TILESETS
- Provide or locate the folder JA2\DATA\TILESETS a folder with the number of the Tilesets to be worked on as well as a subfolder named "T"
- Provide or locate the folder JA2\DATA\BINARYDATA
- Extract the BINARYDATA.SLF in the folder JA2\DATA\BINARYDATA
Exchange of whole STI files
First locate the STI file that you want to substitute. Use in addition the tables in the appendix. Once you have decided which new STI you want to use, give it a name which hasn't been used in the tileset before. Then load JA2TSE to begin. JA2TSE (Jagged Alliance 2 Tileset Editor) is a small program which enables editing of the data contained in JA2SET.DAT giving you the ability to change and mix values to create new tilesets.
In JA2TSE look for the required tileset your map uses and click on it. Then look in the right frame of the program for the numbered slot and the name of the STI file it uses. You will note there are usually two elements, the STI and it's matching Shadow S.STI. By clicking on the selected Sti you can change the file name to use your new STI file. Then one copies the files of the newly added objects in the suitable tileset folder. Pay attention that the files in the JA2SET.DAT correspond to the tileset, otherwise it will result in a critical failure when you go to run the game.
The following files will only function correctly if they match with their new components, consisting of The new STI, a JSD - using the same name as the STI and the smaller "T" STI in it's subfolder. The STI is the most straight forward part as you can create a new one in STIEdit or overwrite an existing STI file. You can do the same with JSD's, by editing an existing JSD or duplicate one and edit it accordingly.
Two popular JSD editors available are 'JSDEdit' from Blackdragon available here:
Scroll down and download the JSDEdit.rar from the list
Or the the seemingly more powerful 'JSD Editor' by Pipetz which features a more detailed representation of structures and objects here:
Scroll down and download JSDeditor204 from the list
When working with JSD's ensure the values in the JSD resemble your new object or objects. And above all make sure your JSD you has the same amount of objects that you have in your STI, for example if you have four cars in your STI, make sure you have four car Structures outlined in the JSD.
Changing single graphics in STI files
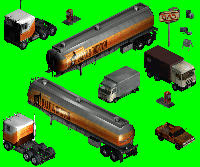
First decide what graphic you want to add, you may be using existing art from an existing Sti file, a brand new piece of artwork just produced, or perhaps something suitable from the net. For best results attempt to use graphics of the correct size and those that follow the generic isometric game angle. As pictured below...

It should also be noted that graphics in JA have no perspective (even this shot above has some) so if using a 3D program you should render from an orthographic window.
A more detailed breakdown of Sprites is featured in a great wiki article here:
http://ja2v113.pbworks.com/w/page/28015925/Anatomy-of-a-spri te
Using your preferred paint program you can copy the new artwork and then paste it into the Sti using STIEdit available here:
Scroll down and download Sti Edit
To prevent current graphics from corrupting or appearing strange you will need to make sure your new art uses the same palette or contains the same colours used in the existing artwork. This is also the case with T files, which should use the exact same palette as their larger parent graphics, otherwise the graphics on the medium map screen will appear corrupt.
Of course if you are creating a totally new set of graphics you can use an original palette, as long as the mask or transparent colour is used/placed correctly.
For more details on Sti palettes I suggest reading 'Usermade Data face bank' thread here:
http://thepit.ja-galaxy-forum.com/index.php?t=msg&th=14861&goto=267668&msg_267668
STIEdit has an annoying habit of corrupting your artwork or rather how it uses palette information, so I'd suggest composing a single image containing all of your objects in one picture (such as the small picture below) and then using the palette from this picture, this will then ensure the image will remap colours correctly and make use of all colours within your different frames when you paste new graphics to the Sti. Even if Sti edit corrupts your palette, you can easily revert back to your original palette or reload it if need be when using a universal/global palette.
From an artistic standpoint the different colours contained within your new images should also be taken into account. To get best results, try to have sti's that group similar coloured images together, rather than a collection of different coloured/shaded objects, this will mean the limited palette of 256 colours can have more subtle gradients of colour, rather than a grainy attempt at mappinig a multi-coloured object. For example a number of grey vehicles and grey metal structures in an Sti will look better than attempting to use an Sti that has a number of multi-coloured vehicles, where the palette is stretched to it's limit.
Also be aware that the first colour in the palette is the mask colour, Sir Tech in their wisdom used solid black with the RGB values of 0,0,0 for their mask. So you should ensure your image does not contain this colour. Black is fine, just don't use absolute 0,0,0 black! Otherwise the game will mistake it as a mask and make it transparent. To be 100% sure you can always hit the double 'T' icon for transparency in the editor which will reveal the mask by turning it off and on, giving you a clear indication what areas the mask will remove. Once your new Sti is ready, you can check how they appear in the Map editor, or even in game.
Tip:
Some have found by experience that it is a good idea to take notes and write down the names of the objects within a tileset before editing begins, unfortunately naming conventions within the tileset are limited and are not always detailed or descriptive enough to inform modders what they actually represent. Understanding what the current tileset contains beforehand can assist users before any editing decisions are made.
Below is the complete list of tilesets from JA2 (00-49) and the additional Unfinished Business tileset pack (50-59)
List of default Tilesets-------------
00 GENERIC 1
01 CAVES (Mines) 1
02 DESERT 1
03 LUSH 1 (Dirt roads)
04 TROPICAL 1
05 MOUNTAINS 1
06 COASTAL 1
07 SWAMP 1
08 FARM 1
09 OMERTA
10 GENERIC 2 (Dirt roads)
11 FARM 2 (Ruined walls)
12 PRISON
13 HOSPITAL (Cambria)
14 DEMO BASEMENT
15 BURNT TREES
16 LAWLESS 1 (San Mona-D5)
17 AIRSTRIP(Drassen-B13)
18 LAWLESS 2 (Burnt-C5)
19 DEAD AIRSTRIP (Drassen-C13)
20 BASEMENT
21 LAWLESS 3 (Burnt-C6)
22 PRISON DUNGEON
23 ACTIVE DRASSEN (D13)
24 SAM SITES
25 LUSH 2 (Different Trees)
26 MILITARY BASE
27 MILITARY JAIL
28 MILITARY WAREHOUSE
29 MILITARY TOWN
30 OLD SCHOOL
31 CAMBRIA STRIP
32 CAMBRIA HOMES
33 PALACE!
34 TROPICAL SAM
35 GRUMM g2, h2
36 GRUMM g1, h1
37 BALIME
38 BALIME MUSEUM
39 DESERT SAM
40 ORTA
41 ORTA WEAPONS
42 SWAMP BARETREES
43 ESTONI
44 QUEEN'S PRISON
45 QUEEN'S TROPICAL
46 MEDUNA INNER TOWN
47 QUEEN'S SAM
48 QUEEN's AIRPORT
49 DEMO TILESET
----UB SETS----
50 Lots of SNOW
51 MIXED SNOW
52 GRASS & SNOW
53 FALL TOWN
54 MINING TOWN
55 POWER PLANT
56 SEWERS
57 UNDERGROUND COMPLEX
58 UPPER COMPLEX
59 LOWEST LEVEL COMPLEX
Each of these tilesets are then divided within the tileset editor into sub groups or storage spaces, for use in the map editor as follows. All tilesets use the same directory structure but do not necessarily match their titles, for example there may be a sub directory called 'rocks' but it may contain oil drums or barrels. Below is how the directories are arranged.
Storage spaces - Directory structure:
TERRAIN
0. Ground textures 9 slots
1. Banks & cliffs: 5 slots
ANIOSTRUCT
FIRSTCLIFF
FIRSTCLIFFHANG
FIRSTROAD
FENCESTRUCT
2. Roads: 1 slot
FIRSTROAD
3. Debris: 8 slots
Of ROCK
WOOD
WEEDS
GRASS
SAND
MISC
MISC2
ANOTHERDEBRIS
4. Trees: 3 slots
OFSTRUCT1
OFSTRUCT2
OSTRUCT6
5. Rocks: 3 slots
OSTRUCT4
OSTRUCT1
OSTRUCT2
6. Barrels & other junk: 12 slots
OSTRUCT3
OSTRUCT5
OSTRUCT7
OSTRUCT8
FIRSTVEHICLE
SECONDVEHICLE
FIRSTDEBRISSTTRUCT
SECONDDEBRISSTTRUCT
FIRSTLARGEEXPLODEDERBRIS
SECONDLARGEEXPLODEDERBRIS
NINTHOSTRUCT
TENTHOSTRUCT
BUILDINGS
1. Walls: 4 slots
WALL1
WALL2
WALL3
WALL4
2. Doors: 4 slots
DOOR1
DOOR2
DOOR3
DOOR4
3. Roofs: 12 slots
ROOF1
ROOF2
ROOF3
ROOF4
SROOF1
SROOF2
WALL1
WALL2
WALL3
WALL4
ONROOF1
ONROOF2
4. Damaged walls: 8 slots
DECORATIONS1
DECORATIONS2
DECORATIONS3
DECORATIONS4
WALL1
WALL2
WALL3
WALL4
5. Window: 4 slots
WALL1
WALL2
WALL3
WALL4
6. Furniture: 5 slots
ISTRUCT1
ISTRUCT2
ISTRUCT3
ISTRUCT4
FIRSTCISTRUCT
7. Wall decals: 9 slots
WALLDECAL1
WALLDECAL2
WALLDECAL3
WALLDECAL4
WALLDECAL5
WALLDECAL6
WALLDECAL7
WALLDECAL8
FIRSTSWITCHES
8.Floors: 4 slots
FLOOR1
FLOOR2
FLOOR3
FLOOR4
9. Generic furniture: 4 slots
FIFTHISTRUCT
SIXTHISTRUCT
SEVENTHISTRUCT
EIGHTISTRUCT
10. Rest - This sub directory generally contains a mix of in-game graphics such as icons and is not entirely relevant to map building. You will not need to edit these when creating your own maps or tiles, but their descriptions have been included in the list below (beginning at tile 048.)
***** Complete tiles list 000 - 150 ********************************
000 - Ground textures 1
001 - Ground textures 2
002 - Ground textures 3
003 - Ground textures 4
004 - Ground textures 5
005 - Ground textures 6
006 - Ground textures 7
007 - Ground textures - water texture 1
008 - Ground textures - water texture 2
009 - Banks and cliffs
010 - Banks and cliffs
011 - Banks and cliffs
012 - Rocks
013 - Rocks
014 - Barrels and other junk
015 - Rocks
016 - Barrels and other junk
017 - Trees
018 - Barrels and other junk
019 - Barrels and other junk
020 - Trees
021 - Trees
022 - Trees
023 - Trees
024 - Rocks
025 - Rocks
026 - Barrels and other junk
027 - Rocks
028 - Barrels and other junk
029 - Trees
030 - Barrels and other junk
031 - Barrels and other junk
032 - Trees
033 - Trees
034 - Trees
035 - Trees
036 - Walls
037 - Walls
038 - Walls
039 - Walls
040 - Doors
041 - Doors
042 - Doors
043 - Doors
044 - Doors
045 - Doors
046 - Doors
047 - Doors
048 - Rest [roofceil.sti]
049 - Debris
050 - Rest [roadtile.sti]
051 - Rest [window1.sti]
052 - Damaged walls
053 - Damaged walls
054 - Damaged walls
055 - Damaged walls
056 - Wall decals
057 - Wall decals
058 - Wall decals
059 - Wall decals
060 - Floors
061 - Floors
062 - Floors
063 - Floors
064 - Roofs
065 - Roofs
066 - Roofs
067 - Roofs
068 - Roofs
069 - Roofs
070 - Roofs
071 - Roofs
072 - Rest [highl3.sti]
073 - Furniture
074 - Furniture
075 - Furniture
076 - Furniture
077 - Furniture
078 - Banks and cliffs
079 - Debris
080 - Debris
081 - Debris
082 - Debris
083 - Debris
084 - Debris
085 - Banks and cliffs
086 - Banks and cliffs
087 - Banks and cliffs
088 - Barrels and other junk
089 - Barrels and other junk
090 - Barrels and other junk
091 - Barrels and other junk
092 - Debris
093 - Barrels and other junk
094 - Barrels and other junk
095 - Barrels and other junk
096 - Barrels and other junk
097 - Barrels and other junk
098 - Barrels and other junk
099 - Barrels and other junk
100 - Barrels and other junk
101 - Rest - rubble and remains left after an explosion
102 - Rest - rubble and remains left after an explosion
103 - Barrels and other junk
104 - Barrels and other junk
105 - Barrels and other junk
106 - Barrels and other junk
107 - Furniture
108 - Generic furniture
109 - Generic furniture
110 - Generic furniture
111 - Rest [flat_r4.sti]
112 - Rest [flat_r4.sti]
113 - Wall decals
114 - Wall decals
115 - Wall decals
116 - Wall decals
117 - Rest - Bloodstains
118 - Rest - Bug bloodstains
119 - Wall decals
120 - Rest [slant_01.sti]
121 - Rest [flat_r4.sti]
122 - Rest [flat_r4.sti]
123 - Rest - Weapons on the map
124 - Rest - Objects on the map
125 - Rest - Objects on the map
126 - Rest - Broken glass
127 - Rest - objects on the map
128 - Rest - exploding person
129 - Rest [exittex.sti]
130 - Rest Footprints (Merc pathways)
131 - Rest cursor (quadrangle)
132 - Rest Arrows
133 - Rest [ptrs3.sti]
134 - Rest Run icon
135 - Rest go for icon
136 - Rest [g-swat] for icon
137 - Rest glide icon
138 - Rest Select icon
139 - Rest Action icon
140 - Rest take icon
141 - Rest x
142 - Restring around sources of light (editor)
143 - Rest Key icon
144 - Rest ring around objects (editor)
145 - Rest [highl3.sti]
146 - Rest [bull.sti]
147 - Rest miss1 ball
148 - Rest water miss ball
149 - Rest water wave ripples
150 - Rest Wireframe grid
3 FIRSTCLIFFHANG
2 FIRSTCLIFF
3 (S) FIRSTCLIFFHANG
2 OSTRUCT1
3 OSTRUCT2
1 OSTRUCT3
1 OSTRUCT4
2 OSTRUCT5
3 OSTRUCT6
3 OSTRUCT7
4 OSTRUCT8
1 OFSTRUCT1
2 OFSTRUCT2
2 (S) OSTRUCT1
3 (S) OSTRUCT2
1 (S) OSTRUCT3
1 (S) OSTRUCT4
2 (S) OSTRUCT5
3 (S) OSTRUCT6
3 (S) OSTRUCT7
4 (S) OSTRUCT8
1 (S) OFSTRUCT1
2 (S) OFSTRUCT2
1 WALL1
2 WALL2
3 WALL3
4 WALL4
1 DOOR1
2 DOOR2
3 DOOR3
4 DOOR4
1 (S) DOOR1
2 (S) DOOR2
3 (S) DOOR3
4 (S) DOOR4
8 ANOTHERDEBRIS
1 DECORATIONS1
2 DECORATIONS2
3 DECORATIONS3
4 DECORATIONS4
1 WALLDECAL1
2 WALLDECAL2
3 WALLDECAL3
4 WALLDECAL4
1 FLOOR1
2 FLOOR2
3 FLOOR3
4 FLOOR4
1 ROOF1
2 ROOF2
3 ROOF3
4 ROOF4
5 SROOF1
6 SROOF2
7 ONROOF1
8 ONROOF1
1 ISTRUCT1
2 ISTRUCT2
3 ISTRUCT3
4 ISTRUCT4
5 FIRSTCISTRUCT
5 FIRSTROAD
1 ROCKS
2 WOOD
3 WEEDS
4 GRASS
5 SAND
6 MISC
1 ANIOSTRUCT
5 FENCESTRUCT
5 (S) FENCESTRUCT
5 FIRSTVEHICLE
6 SECONDVEHICLE
6 (S) FIRSTVEHICLE
5 (S) SECONDVEHICLE
7 MISC2
7 FIRSTDEBRISSTTRUCT
8 SECONDDEBRISSTTRUCT
7 (S) FIRSTDEBRISSTTRUCT
8 (S) SECONDDEBRISSTTRUCT
11 NINTHOSTRUCT
12 TENTHOSTRUCT
11 (S) NINTHOSTRUCT
12 (S) TENTHOSTRUCT
9 FIRSTLARGEEXPLODEDERBRIS
10 SECONDLARGEEXPLODEDERBRIS
9 (S) FIRSTLARGEEXPLODEDERBRIS
10 (S) SECONDLARGEEXPLODEDERBRIS
1 FIFTHISTRUCT
2 SIXTHISTRUCT
3 SEVENTHISTRUCT
4 EIGHTISTRUCT
5 WALLDECAL5
6 WALLDECAL6
7 WALLDECAL7
8 WALLDECAL8
9 FIRSTSWITCHES
Some modders have discovered early on that Sir-Tech did not use all of the available slots or storage spaces within the Sti files, so people wishing to add new elements can easily add graphics to these unused frames without having to mess around editing existing the tilesets themselves. Another consideration is Sir-Tech also repeated the use of some tiles, such as the oil barrels, and interior furniture which are wastefully duplicated throughout some of the sets. A reorganisation of these elements and removal of duplicates can free up space for a more varied choice of objects in a tileset. Smeagol has used this technique for his AIMNAS mod, resulting in better use of tiles available in his maps.
[Updated on: Tue, 21 June 2022 11:46] Report message to a moderator
|
|
|
|
|
 |
|
Tileset editing guidelines
By: Hawkeye on Thu, 30 December 2010 03:53 |
|
|
Re: Tileset editing guidelines
By: smeagol on Thu, 30 December 2010 20:54 |
|
|
Re: Tileset editing guidelines
By: Hawkeye on Fri, 31 December 2010 01:57 |
|
|
Re: Tileset editing guidelines
By: Hawkeye on Sun, 20 February 2011 04:13 |
|
|
Re: Tileset editing guidelines
By: Hawkeye on Tue, 28 June 2011 08:40 |
|
|
Re: Tileset editing guidelines
|
|
|
Re: Tileset editing guidelines
By: Hawkeye on Fri, 01 July 2011 03:43 |
|
|
Re: Tileset editing guidelines
By: SharkD on Sat, 02 July 2011 19:50 |
|
|
Re: Tileset editing guidelines
By: Hawkeye on Sun, 03 July 2011 05:36 |
|
|
Re: Tileset editing guidelines
By: SharkD on Sun, 03 July 2011 09:14 |
|
|
Re: Tileset editing guidelines
By: Hawkeye on Mon, 04 July 2011 09:23 |
|
|
Re: Tileset editing guidelines
By: Bobby R. on Wed, 06 March 2019 10:36 |
|
|
Re: Tileset editing guidelines
By: Deleted. on Wed, 06 March 2019 11:18 |
|
|
Re: Tileset editing guidelines
By: Bobby R. on Wed, 06 March 2019 20:43 |
|
|
Re: Tileset editing guidelines
By: townltu on Wed, 06 March 2019 23:37 |
|
|
Re: Tileset editing guidelines
By: Bobby R. on Thu, 07 March 2019 00:00 |
|
|
Re: Tileset editing guidelines
By: townltu on Thu, 07 March 2019 00:48 |
|
|
Re: Tileset editing guidelines
By: Bobby R. on Thu, 07 March 2019 01:02 |
Goto Forum:
Current Time: Thu Apr 18 03:26:00 GMT+3 2024
Total time taken to generate the page: 0.01108 seconds
|